前言:之前本博客一直使用的是畅言的评论框,看好的是它的易维护性。然而随着博主的水平提高,也越来越爱瞎折腾。畅言的成品评论框已不能满足我的需求,遂又换回了wordpress的原生评论框。
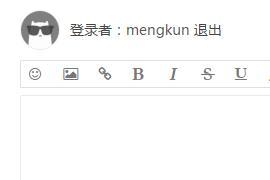
Nana主题自带的评论框已经集成了垃圾评论过滤、插入表情、评论邮件提醒等功能,但我测试了一下,似乎存在一个xss漏洞(又经过测试发现游客评论并不会触发)。在填补这个漏洞的同时,又顺手给评论框加了个工具条,使得评论的玩法更丰富。在这里顺带放出相关教程。
注:本教程仅针对Nana主题,其它主题虽异曲同工,但需要改动才能适配。具体的自己尝试。
1、打开Nana主题的目录(/wp-content/themes/Nana),新建一个 css 文件,命名为 “comment-tools.css”,往里面贴入如下代码:
- /**
- * WordPress 评论多功能工具条css部分
- * 修改、完善自网络代码 By 孟坤博客
- * 文章地址: https://mkblog.cn/401/
- **/
- /******************/
- /*以下为针对评论内容的修正*/
- /******************/
- /*去除 取消回复 的加粗*/
- #cancel-comment-reply-link{
- font-weight:normal;
- }
- /*昵称及等级不要加粗*/
- .comment-author .duzhe,.comment-author .dengji{
- font-weight:normal;
- }
- /*楼层不要加粗*/
- .comment-aux .floor{
- font-weight:normal;
- }
- /*评论内容加黑*/
- .comment-author p{
- color: #000;
- }
- /*超链接显示为蓝色*/
- .comment-author .comment-t-a{
- color: #0DAAEA;
- }
- /*倾斜文字*/
- .comment-author .comment-t-i{
- font-style: italic;
- }
- /*评论中引用的内容*/
- .comment-author .comment-t-blockquote{
- padding: 10px;
- margin: 10px 10px 10px 60px;
- width: auto;
- }
- /*评论中引用的内容中的文字段落*/
- .comment-author .comment-t-blockquote p{
- padding-left: 0;
- color: #666;
- }
- /*评论图片不要太宽*/
- .comment-author .comment-t-img{
- max-width: 100%;
- }
- /*代码*/
- .comment-author .comment-t-pre {
- padding-left: 60px;
- }
- /*评论内容垂直居中,同时新加评论预览不会顶在上面*/
- .comment-list{
- margin: 5px 0;
- }
- /*去掉莫名其妙的阴影*/
- #respond{
- box-shadow: none;
- }
- /******************/
- /*以下为评论工具条*/
- /******************/
- .smiley{ /*针对nana主题:去掉主题自带的表情按钮*/
- display: none;
- }
- .smiley-box{ /*针对nana主题:防止在移动端表情框太宽,跑出去了*/
- width: 100%;
- max-width: 497px;
- }
- #editor_tools{
- display: inline–block;
- line-height: 26px;
- border: 1px #e0e0e0 solid;
- border-radius: 2px 2px 0 0;
- overflow: hidden;
- z-index: 99999;
- }
- #editor_tools #editor .tools_tip{
- padding-left: 5px;
- display: none; /*如果需要显示文字,请去掉这个*/
- }
- #editor_tools a{
- color: #777;
- display: inline–block;
- padding: 0 8px;
- height: 26px;
- min-width: 30px;
- text-align: center;
- }
- #editor_tools a:hover{
- color: #333;
- text-decoration: none;
- }
- #fontcolor{
- display: none;
- line-height: 20px;
- border: 2px #e0e0e0 solid;
- z-index: 99999;
- margin-bottom: 10px;
- padding: 4px 0 0 4px;
- max-width: 376px;
- }
- #fontcolor a{
- display: inline–block;
- height: 16px;
- width: 16px;
- }
2、再打开 Nana 主题目录下的 js 文件夹,在里面新建一个js文件,命名为 “comment-tools.js” ,并往里面贴入以下代码:
- /**
- * WordPress 评论多功能工具条css部分
- * 修改、完善自网络代码 By 孟坤博客
- * 文章地址: https://mkblog.cn/401/
- **/
- $(function () {
- $(“#comment-smiley”).click(function(){ //点击弹出表情
- $(‘.smiley-box’).animate({
- opacity: ‘toggle’,
- left: ’50px’
- }, 1000).animate({
- left: ’10px’
- }, ‘fast’);
- return false;
- });
- $(“#font-color”).click(function(){ //点击弹出颜色
- $(“#fontcolor”).toggle(500);
- });
- $(“#comment”).click(function(){ //点击输入框隐藏颜色
- $(“#fontcolor”).hide(500);
- });
- });
- jQuery(function() {
- function addEditor(a, b, c) {
- if (document.selection) {
- a.focus();
- sel = document.selection.createRange();
- c ? sel.text = b + sel.text + c: sel.text = b;
- a.focus()
- } else if (a.selectionStart || a.selectionStart == ‘0’) {
- var d = a.selectionStart;
- var e = a.selectionEnd;
- var f = e;
- c ? a.value = a.value.substring(0, d) + b + a.value.substring(d, e) + c + a.value.substring(e, a.value.length) : a.value = a.value.substring(0, d) + b + a.value.substring(e, a.value.length);
- c ? f += b.length + c.length: f += b.length – e + d;
- if (d == e && c) f -= c.length;
- a.focus();
- a.selectionStart = f;
- a.selectionEnd = f
- } else {
- a.value += b + c;
- a.focus()
- }
- }
- var myDate = new Date();
- var mytime=myDate.toLocaleTimeString()
- var g = document.getElementById(‘comment’) || 0;
- var h = {
- strong: function() { //粗体文字
- addEditor(g, ‘[b]’, ‘[/b]’);
- },
- em: function() { //斜体文字
- addEditor(g, ‘[i]’, ‘[/i]’);
- },
- del: function() { //删除线
- addEditor(g, ‘[del]’, ‘[/del]’);
- },
- underline: function() { //下划线
- addEditor(g, ‘[u]’, ‘[/u]’);
- },
- quote: function() { //引用
- addEditor(g, ‘[blockquote]’, ‘[/blockquote]’);
- },
- ahref: function() {
- var a = prompt(‘请输入链接地址’, ‘http://’);
- var b = prompt(‘请输入链接内容’, ”);
- if (a) { //超链接
- addEditor(g, ‘[url=’ + a + ‘]’ + b + ‘[/url]’, ”);
- }
- },
- img: function() { //图片
- var a = prompt(‘请输入图片地址’, ‘http://’);
- if (a) {
- addEditor(g, ‘
‘, ”);
- }
- },
- sign: function() { //签到
- addEditor(g, ‘好文帮顶 & 顺便留个名~时间:’ + mytime, ”);
- },
- code: function() { //代码段
- addEditor(g, ‘[pre]’, ‘[/pre]’);
- },
- red: function() { //各种颜色
- addEditor(g, ‘[color=red]’, ‘[/color]’);
- },
- fuchsia: function() {
- addEditor(g, ‘[color=fuchsia]’, ‘[/color]’);
- },
- purple: function() {
- addEditor(g, ‘[color=purple]’, ‘[/color]’);
- },
- orange: function() {
- addEditor(g, ‘[color=orange]’, ‘[/color]’);
- },
- yellow: function() {
- addEditor(g, ‘[color=yellow]’, ‘[/color]’);
- },
- olive: function() {
- addEditor(g, ‘[color=olive]’, ‘[/color]’);
- },
- lime: function() {
- addEditor(g, ‘[color=lime]’, ‘[/color]’);
- },
- maroon: function() {
- addEditor(g, ‘[color=maroon]’, ‘[/color]’);
- },
- aqua: function() {
- addEditor(g, ‘[color=aqua]’, ‘[/color]’);
- },
- teal: function() {
- addEditor(g, ‘[color=teal]’, ‘[/color]’);
- },
- green: function() {
- addEditor(g, ‘[color=green]’, ‘[/color]’);
- },
- blue: function() {
- addEditor(g, ‘[color=blue]’, ‘[/color]’);
- },
- navy: function() {
- addEditor(g, ‘[color=navy]’, ‘[/color]’);
- },
- gray: function() {
- addEditor(g, ‘[color=gray]’, ‘[/color]’);
- },
- deepskyblue: function() {
- addEditor(g, ‘[color=deepskyblue]’, ‘[/color]’);
- },
- gold: function() {
- addEditor(g, ‘[color=gold]’, ‘[/color]’);
- }, silver: function() {
- addEditor(g, ‘[color=silver]’, ‘[/color]’);
- },
- black: function() {
- addEditor(g, ‘[color=black]’, ‘[/color]’);
- }
- };
- window[‘SIMPALED’] = {};
- window[‘SIMPALED’][‘Editor’] = h
- });
3、打开Nana主题目录下的 inc 文件夹,在里面新建一个php文件,命名为 “comment-tools.php” 并在里面贴入如下代码:
- <!– 评论框工具条 inc->comment-tools.php –>
- <div id=“editor_tools”>
- <div id=“editor”>
- <a href=“javascript:;” id=“comment-smiley” title=“点击插入表情”>
- <i class=“fa fa-smile-o” aria-hidden=“true”></i><span class=“tools_tip”>表情</span>
- </a>
- <a href=“javascript:SIMPALED.Editor.img()” title=“点击插入图片”>
- <i class=“fa fa-picture-o” aria-hidden=“true”></i><span class=“tools_tip”>图片</span>
- </a>
- <a href=“javascript:SIMPALED.Editor.ahref()” title=“点击插入超链接”>
- <i class=“fa fa-link” aria-hidden=“true”></i><span class=“tools_tip”>链接</span>
- </a>
- <a href=“javascript:;” id=“font-color” title=“点击插入彩色文字”>
- <i class=“fa fa-eyedropper” aria-hidden=“true”></i><span class=“tools_tip”>颜色</span>
- </a>
- <a href=“javascript:SIMPALED.Editor.strong()” title=“点击插入粗体文字”>
- <i class=“fa fa-bold” aria-hidden=“true”></i><span class=“tools_tip”>加粗</span>
- </a>
- <a href=“javascript:SIMPALED.Editor.em()” title=“点击插入斜体文字”>
- <i class=“fa fa-italic” aria-hidden=“true”></i><span class=“tools_tip”>倾斜</span>
- </a>
- <a href=“javascript:SIMPALED.Editor.del()” title=“点击插入删除线”>
- <i class=“fa fa-strikethrough” aria-hidden=“true”></i><span class=“tools_tip”>删除线</span>
- </a>
- <a href=“javascript:SIMPALED.Editor.underline()” title=“点击插入下划线”>
- <i class=“fa fa-underline” aria-hidden=“true”></i><span class=“tools_tip”>下划线</span>
- </a>
- <a href=“javascript:SIMPALED.Editor.quote()” title=“点击插入引用内容”>
- <i class=“fa fa-quote-left” aria-hidden=“true”></i><span class=“tools_tip”>引用</span>
- </a>
- <a href=“javascript:SIMPALED.Editor.code()” title=“点击插入代码段”>
- <i class=“fa fa-code” aria-hidden=“true”></i><span class=“tools_tip”>代码</span>
- </a>
- <a href=“javascript:SIMPALED.Editor.sign()” title=“点击插入签到代码”>
- <i class=“fa fa-check-circle” aria-hidden=“true”></i><span class=“tools_tip”>签到</span>
- </a>
- </div>
- </div>
- <div id=“fontcolor”>
- <a href=“javascript:SIMPALED.Editor.red()” style=“background-color: red”></a>
- <a href=“javascript:SIMPALED.Editor.fuchsia()” style=“background-color: fuchsia”></a>
- <a href=“javascript:SIMPALED.Editor.purple()” style=“background-color: purple”></a>
- <a href=“javascript:SIMPALED.Editor.orange()” style=“background-color: orange”></a>
- <a href=“javascript:SIMPALED.Editor.yellow()” style=“background-color: yellow”></a>
- <a href=“javascript:SIMPALED.Editor.gold()” style=“background-color: gold”></a>
- <a href=“javascript:SIMPALED.Editor.olive()” style=“background-color: olive”></a>
- <a href=“javascript:SIMPALED.Editor.lime()” style=“background-color: lime”></a>
- <a href=“javascript:SIMPALED.Editor.aqua()” style=“background-color: aqua”></a>
- <a href=“javascript:SIMPALED.Editor.deepskyblue()” style=“background-color: deepskyblue”></a>
- <a href=“javascript:SIMPALED.Editor.teal()” style=“background-color: teal”></a>
- <a href=“javascript:SIMPALED.Editor.green()” style=“background-color: green”></a>
- <a href=“javascript:SIMPALED.Editor.blue()” style=“background-color: blue”></a>
- <a href=“javascript:SIMPALED.Editor.maroon()” style=“background-color: maroon”></a>
- <a href=“javascript:SIMPALED.Editor.navy()” style=“background-color: navy”></a>
- <a href=“javascript:SIMPALED.Editor.gray()” style=“background-color: gray”></a>
- <a href=“javascript:SIMPALED.Editor.silver()” style=“background-color: silver”></a>
- <a href=“javascript:SIMPALED.Editor.black()” style=“background-color: black”></a>
- </div>
- <!–评论框工具条核心js文件–>
- <script src=“<?php bloginfo(‘template_directory’); ?>/js/comment-tools.js”></script>
- <!–评论框工具条核心css文件–>
- <link rel=“stylesheet” href=“<?php bloginfo(‘template_directory’); ?>/comment-tools.css” type=“text/css” media=“all”>
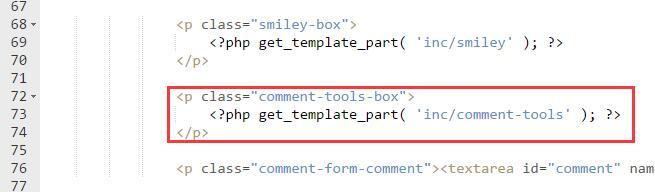
4、打开Nana主题目录下的“comments.php”,找到第70行
- <p class=“smiley-box”>
- <?php get_template_part( ‘inc/smiley’ ); ?>
- </p>
在它的后面添加
- <p class=“comment-tools-box”>
- <?php get_template_part( ‘inc/comment-tools’ ); ?>
- </p>
5、最后一步!打开Nana主题目录下的“functions.php”,拉到最下面,在最后一行的“ ?> ”前面加入以下代码:
- /**
- * WordPress 评论多功能工具条后台处理部分
- * 编写 By 孟坤博客
- * 文章地址: https://mkblog.cn/401/
- **/
- function comment_code_escape( $incoming_comment ) {
- $incoming_comment = str_replace(array(‘<‘, ‘>’), array(‘<’, ‘>’), $incoming_comment);//第一步就去掉尖括号,防止xss htmlspecialchars($incoming_comment, ENT_NOQUOTES);
- $incoming_comment = preg_replace(‘/\[b\](.*?)\[\/b\]/is’,'<b class=“comment-t-b”>$1</b>’, $incoming_comment); //转换粗体
- $incoming_comment = preg_replace(‘/\[i\](.*?)\[\/i\]/is’,'<i class=“comment-t-i”>$1</i>’, $incoming_comment); //转换斜体
- $incoming_comment = preg_replace(‘/\[u\](.*?)\[\/u\]/is’,'<u class=“comment-t-u”>$1</u>’, $incoming_comment); //转换下划线
- $incoming_comment = preg_replace(‘/\[del\](.*?)\[\/del\]/is’,'<del class=“comment-t-del”>$1</del>’, $incoming_comment); //转换删除线
- $incoming_comment = preg_replace(‘/\[pre\](.*?)\[\/pre\]/is’,'<pre class=“comment-t-pre”>$1</pre>’, $incoming_comment); //转换代码
- $incoming_comment = preg_replace(‘/\[blockquote\](.*?)\[\/blockquote\]/is’,'<blockquote class=“comment-t-blockquote”>$1</blockquote>’, $incoming_comment); //转换引用
- $incoming_comment = preg_replace(‘/\[color=([\w|#]*?)\](.*?)\[\/color\]/is’,'<span style=“color: $1” class=“comment-t-color”>$2</span>’, $incoming_comment); //转换颜色
- $incoming_comment = preg_replace(‘/\[url=(.*?)\](.*?)\[\/url\]/is’,'<a href=“$1” target=“_blank” class=“comment-t-a”>$2</a>’, $incoming_comment); //转换超链接
- $incoming_comment = preg_replace(‘/\
(.*?)\[\/img\]/is’,'<a href=“$1” class=“cboxElement comment-t-img-a” rel=“example_group”><img src=“$1” class=“comment-t-img aligncenter size-full wp-image-393 box-hide box-show”></a>’, $incoming_comment); //转换图片
- return $incoming_comment;
- }
- //用户在进行评论时就进行处理(即先进行替换,再写进数据库)
- //add_filter( ‘preprocess_comment’, ‘comment_code_escape’ );
- //在评论显示出来时进行处理(推荐) (即评论按原样写进数据库,再读出来时进行替换)
- add_filter( ‘comment_text’, ‘comment_code_escape’ ); //显示时替换
- add_filter( ‘comment_text_rss’, ‘comment_code_escape’ ); //显示时替换
注:这里提供了两种后台替换方式,各有利弊,自己权衡选择。
为了方便修改,我已将上述“comment-tools.css”、“comment-tools.js”和“comment-tools.php”打包
百度网盘 永硕E盘
2016-12-5更新
我采用的是评论输出再转义替换的方法,更改完后发现wordpress会自动为链接加上超链接再输出。因为我在上面的代码把尖括号都作了转义,所以最终输出的链接变成了如下这个样子:

解决办法是将尖括号转义单独提取出来,放在评论“入库”时处理,然后去掉wordpress的评论自动解析超链接功能。最终的 function.php 里的代码如下:
- /**
- * WordPress 评论多功能工具条后台处理部分
- * 编写 By 孟坤博客
- * 文章地址: https://mkblog.cn/401/
- **/
- function comment_code_escape( $incoming_comment ) {
- $incoming_comment = preg_replace(‘/\[b\](.*?)\[\/b\]/is’,'<b class=“comment-t-b”>$1</b>’, $incoming_comment); //转换粗体
- $incoming_comment = preg_replace(‘/\[i\](.*?)\[\/i\]/is’,'<i class=“comment-t-i”>$1</i>’, $incoming_comment); //转换斜体
- $incoming_comment = preg_replace(‘/\[u\](.*?)\[\/u\]/is’,'<u class=“comment-t-u”>$1</u>’, $incoming_comment); //转换下划线
- $incoming_comment = preg_replace(‘/\[del\](.*?)\[\/del\]/is’,'<del class=“comment-t-del”>$1</del>’, $incoming_comment); //转换删除线
- $incoming_comment = preg_replace(‘/\[pre\](.*?)\[\/pre\]/is’,'<pre class=“comment-t-pre”>$1</pre>’, $incoming_comment); //转换代码
- $incoming_comment = preg_replace(‘/\[blockquote\](.*?)\[\/blockquote\]/is’,'<blockquote class=“comment-t-blockquote”>$1</blockquote>’, $incoming_comment); //转换引用
- $incoming_comment = preg_replace(‘/\[color=([\w|#]*?)\](.*?)\[\/color\]/is’,'<span style=“color: $1” class=“comment-t-color”>$2</span>’, $incoming_comment); //转换颜色
- $incoming_comment = preg_replace(‘/\[url=(.*?)\](.*?)\[\/url\]/is’,'<a href=“$1” target=“_blank” class=“comment-t-a”>$2</a>’, $incoming_comment); //转换超链接
- $incoming_comment = preg_replace(‘/\
(.*?)\[\/img\]/is’,'<a href=“$1” class=“cboxElement comment-t-img-a” rel=“example_group”><img src=“$1” class=“comment-t-img aligncenter size-full wp-image-393 box-hide box-show”></a>’, $incoming_comment); //转换图片
- return $incoming_comment;
- }
- //在评论显示出来时进行处理
- add_filter( ‘comment_text’, ‘comment_code_escape’ ); //评论显示时替换
- add_filter( ‘comment_text_rss’, ‘comment_code_escape’ ); //rss显示时替换
- /**
- * WordPress 评论尖括号处理部分
- * 编写 By 孟坤博客
- **/
- function mk_comment_escape( $incoming_comment ) {
- $incoming_comment = str_replace(array(‘<‘, ‘>’), array(‘<’, ‘>’), $incoming_comment);//去掉尖括号,防止xss
- return $incoming_comment;
- }
- add_filter( ‘preprocess_comment’, ‘mk_comment_escape’ ); //评论写入时就进行转义
- remove_filter( ‘comment_text’, ‘make_clickable’, 9 ); //去除wordpress评论链接自动解析
2016-12-17更新
请参照5楼评论
参考资料
[1]. 给wordpress评论处添加实用工具.爱找主题 http://www.2zzt.com/jcandcj/7397.html
[2]. WordPress开启颜色评论但不造成XSS漏洞的小方法.张戈博客 https://zhangge.net/5010.html
来源:https://mkblog.cn/401/